Azure Health Data Services FHIR – Setup and Configuration
To connect to a FHIR service in Azure Health Data Services (AHDS), first provision the service and register applications in Microsoft Entra ID (Azure AD). In Azure, create an AHDS workspace and then deploy a FHIR service instance within it.
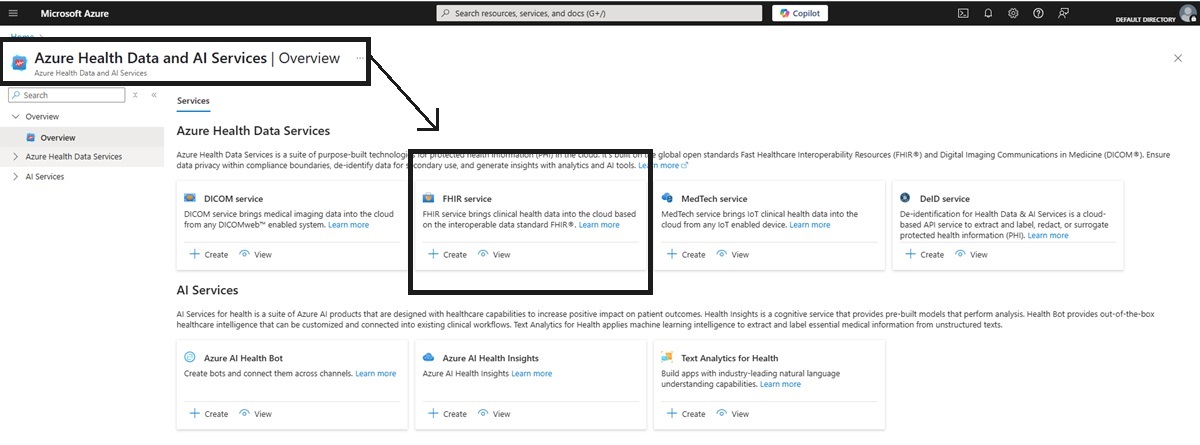
Azure has several options to support Health Data Services, including FHIR.
https://learn.microsoft.com/en-us/azure/healthcare-apis/fhir/deploy-azure-portal
The FHIR service is protected by Azure AD (formerly Entra ID) and requires clients to be authenticated. You must register one or more client applications (service principals) in your Azure AD tenant and assign them appropriate FHIR roles (such as FHIR Data Reader/Writer/Contributor). These roles control which FHIR data operations the app or user can perform. For example, assign the FHIR Data Contributor role to an app that needs full read/write access, or the FHIR SMART User role for apps following SMART-on-FHIR rules. Always secure any client credentials (secrets or certificates) in Azure Key Vault, and rotate them before expiry.
Registering an Azure AD Application (Service Principal)
This service principal represents your app in Azure AD.
Steps via Azure Portal
- In Azure Portal, navigate to Microsoft Entra ID → App registrations, then click New registration.
- Enter a name (e.g., “MyFHIRApp”).
- Choose Accounts in this organizational directory only.
- Optionally configure redirect URIs for auth-code / SMART flows later.
- Click Register
- From the app's Overview, copy the Application (client) ID and Directory (tenant) ID — you’ll need these later.

You need to register your app in Microsoft Entra ID.
hhttps://learn.microsoft.com/en-us/azure/active-directory-b2c/register-apps
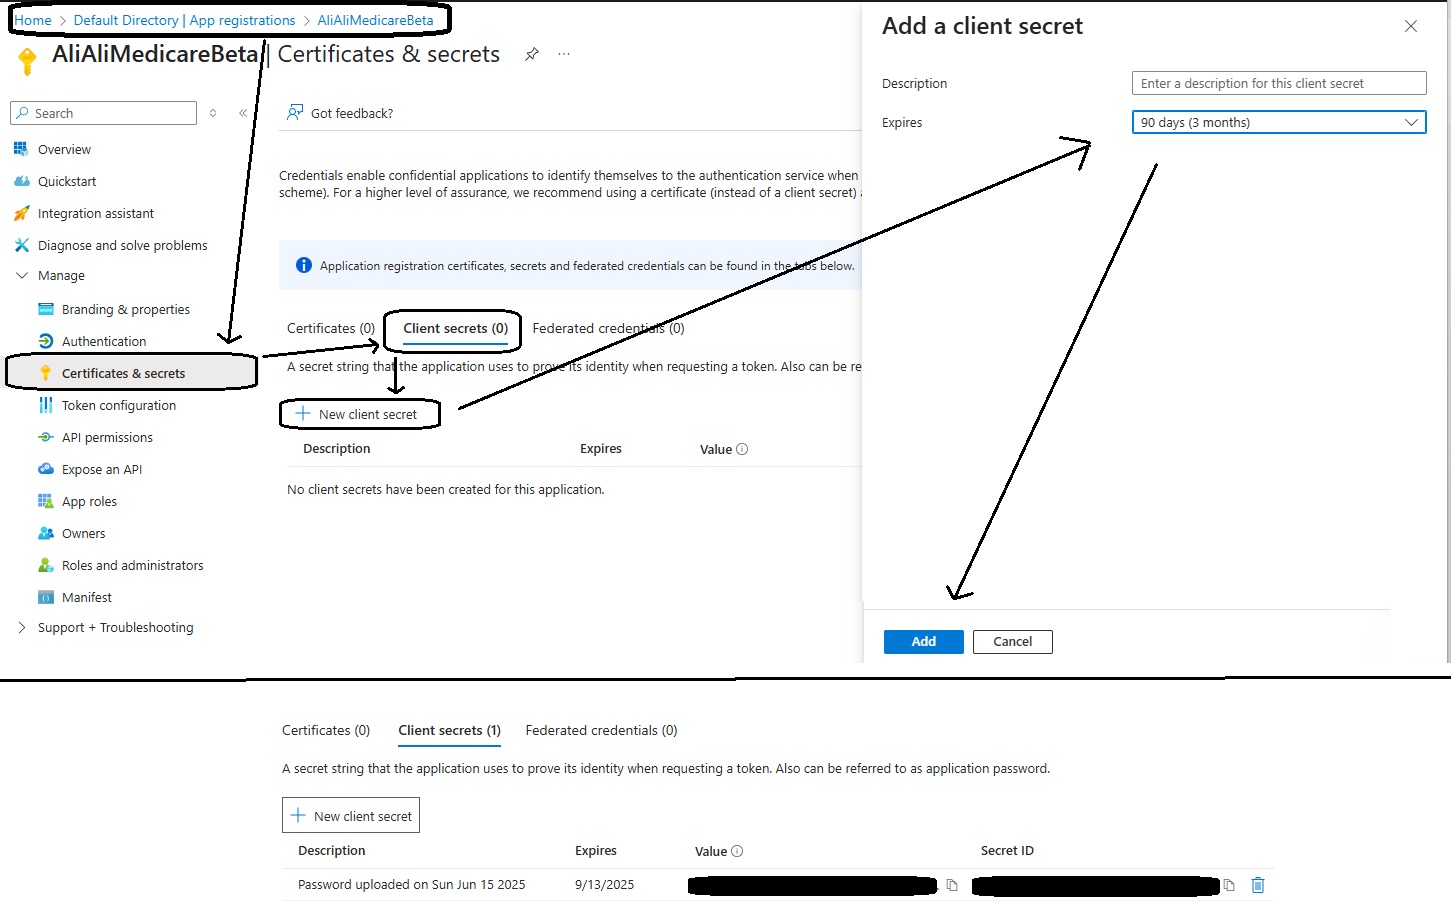
Add credentials
For confidential clients (like backend services):
- Go to Certificates & secrets → New client secret.
- Enter a description and expiration (e.g. 6 or 12 months, per policy).
- Copy the secret value immediately — it’s shown only once
- Store it securely (see next section).
- For public clients (mobile/web apps):
- Enable “Allow public client flows” under Authentication or configure redirect URIs with Authorization Code + PKCE
- Click Save.
Assigning FHIR Data Roles via Azure RBAC
These roles control what operations your app or user can perform on the FHIR service.
Steps
- In the Azure Portal, navigate to your FHIR service instance (not just the workspace).
- Select Access Control (IAM) → Role assignments → + Add → Add role assignment.
- Under Role, choose one of:
- FHIR Data Reader – read & search only
- FHIR Data Writer – includes soft delete
- FHIR Data Exporter/Importer – for bulk operations
- FHIR Data Contributor – full create/read/update/delete
- FHIR SMART User – SMART-specific access (e.g. scopes like patient/*.read)

Azure has roles to support FHIR access.
https://learn.microsoft.com/en-us/azure/healthcare-apis/configure-azure-rbac
- Under Select, search your app’s name (the service principal), select it, and click Save.
- It may take up to ~5 minutes to propagate
- Repeat for multiple environments or stages (dev, test, prod) if needed.
Tip: Use Data Contributor for full read/write access, and SMART User for SMART-on-FHIR scenarios
Storing Secrets Safely in Azure Key Vault
Never store client secrets in code or config files. Store them securely using Key Vault and reference them at runtime.
Key Vault is a secure, cloud-based service for storing and accessing secrets. Use it to store client secrets, certificates, and other sensitive data.
Storing via Portal or CLI
bash :az keyvault secret set \ --vault-name myVault \ --name MyFHIRApp--client-secret \ --value "YOUR-SECRET"
Alternatively, you can also use the Azure Portal GUI to add secrets under Secret. This method actually ensures no copy of the secret is stored in your bash history and can be done without ever having the secret on your local machine.
I prefer this method as it prevents the secret from being stored in your bash history, adding a small extra layer of security and following best practice of zero trust.
Retrieving in Code (Node.js)
js :
import { SecretClient } from "@azure/keyvault-secrets";
import { DefaultAzureCredential } from "@azure/identity";

const kvUrl = "https://myVault.vault.azure.net";
const credential = new DefaultAzureCredential();

const client = new SecretClient(kvUrl, credential);
const latest = await client.getSecret("MyFHIRApp--client-secret");
const clientSecret = latest.value;
This avoids exposing secrets in source code and works seamlessly with Managed Identities. Use Managed Identity wherever possible—that way Azure manages credentials for you and rotation isn't needed.
Automating Secret Rotation
Secrets should not remain static—rotate them regularly (e.g. every 6–12 months).
Option 1: Event-Driven Rotation using Key Vault + Function App :
- Store the secret with metadata tags (e.g., ValidityPeriodDays).
- Configure Key Vault to emit SecretNearExpiry events.
- An Azure Function subscribed to this event:
- Uses Graph API or az commands to generate a new client secret
- Stores new secret in Key Vault, deletes or disables old one
Option 2: Scheduled Rotation via Script or Logic App
- A cron or Logic App job runs monthly.
- Creates a new secret via Azure CLI or Graph API
- Updates Key Vault
- Cleans up old secrets
Simplest route: Use Managed Identity wherever possible—that way Azure manages credentials for you and rotation isn't needed.
Flow Summary
| Step | Action |
|---|---|
| 1 | Register app in Azure AD (App registration) |
| 2 | For backend: create client secret / For mobile/web: enable public/client flows |
| 3 | Assign correct role on FHIR service (Data Reader/Writer/Contributor/SMART User) |
| 4 | Store secret in Azure Key Vault |
| 5 | Use DefaultAzureCredential or SecretClient in app to fetch secret securely |
| 6 | Use MSAL (Node.js/Java) or default credential to authenticate |
| 7 | Optionally set up secret rotation |
| 8 | Monitor and remove expired credentials periodically |
Authorization
After setup, clients must obtain an Azure AD access token and include it in the Authorization: Bearer
OAuth2 Authentication Flows
Azure Health Data Services uses OAuth 2.0 (via Azure AD) for authentication. The main flows are:
- Client Credentials Flow – A server-to-server flow where a daemon or backend app authenticates with its own identity (client ID and secret or certificate), with no user involved. This is ideal for backend services, data pipelines, or integrations (e.g. an EHR system pushing patient data). Using this flow, the app requests a token directly from Azure AD and gets an app-only token. Because there is no user, the token’s privileges are those granted to the application (app roles). Benefits: Fully automated; suitable for high-volume or scheduled data loads; does not require interactive login. Use when: Performing scheduled exports, bulk-loading FHIR bundles, or calling FHIR from server components.
- Authorization Code Flow (with user) – An interactive flow for web or mobile apps. A user signs in through Azure AD (with redirects or pop-up), and the app receives an authorization code which it exchanges for a token. The token represents both the user and the app. Benefits: Tied to a specific user identity; supports fine-grained scopes (e.g. "Patient.read"); allows obtaining ID tokens for sign-in info. Use when: Building a patient or clinician portal, single-page web app, or mobile app where a user must log in and the app should act on the user’s behalf.
- SMART on FHIR Flow – A specialization of the authorization code flow defined by the SMART-on-FHIR standard. It uses OIDC and FHIR-specific scopes (e.g. launch, openid, and clinical scopes like patient/*.read) and often involves a “launch context” from an EHR. SMART adds a layer so users can authorize apps to only access their own FHIR data using standardized scopes. Benefits: Ensures a user’s FHIR data is compartmentalized (via the FHIR fhirUser claim) and only the requested patient data is accessible; leverages the standard SMART profiles; well-suited for EHR-integrated clinical apps. Use when: Implementing apps that launch from an EHR or patient portal with granular user/patient data access.
Each flow requires registering the app in Azure AD with proper redirect URIs and API permissions. For example, a web app using authorization code flow needs a redirect URI (such as https://myapp/signin-oidc), and its Azure AD app must be granted the FHIR Service API permission (often the default “user_impersonation” scope). In the Azure Portal’s Authentication settings for your FHIR service, you must enable the SMART on FHIR proxy if using SMART (this makes the FHIR instance accept the required audience and redirect behavior).
Benefits of each flow: Client credentials let backend services authenticate without user interaction, yielding app-only tokens that can run unattended. Auth code flow binds actions to a user, supporting login, consent prompts, and refresh tokens (so mobile apps can maintain sessions). SMART on FHIR adds standard scopes and a user-centric data model, limiting data to the user’s scope. The choice depends on your scenario: e.g. use client creds for server-to-server APIs or data ingestion; use auth code (with PKCE in mobile/JS) for user-driven applications; use SMART when building standard-compliant healthcare apps that need patient-level data scope.
Obtaining Access Tokens (Examples)
Here are sample code snippets showing how to acquire tokens and call the FHIR API in Node.js (using the @azure/msal-node and @azure/identity libraries) and Java, for different flows: Client Credentials (Node.js): Using MSAL for Node to get an app-only token and call the FHIR Patient endpoint.
const msal = require('@azure/msal-node');
const fetch = require('node-fetch');

const config = {
  auth: {
    clientId: "",
    authority: "https://login.microsoftonline.com/",
    clientSecret: ""
  }
};
const cca = new msal.ConfidentialClientApplication(config);

async function callFHIR() {
  // Acquire token for the FHIR service (app permission scope)
  const tokenResponse = await cca.acquireTokenByClientCredential({
    scopes: ["https://.azurehealthcareapis.com/.default"]
  });
  const token = tokenResponse.accessToken;

  // Call the FHIR API with Bearer token
  const response = await fetch(`https://.azurehealthcareapis.com/Patient`, {
    headers: { 'Authorization': `Bearer ${token}` }
  });
  const data = await response.json();
  console.log("FHIR Patients:", data);
}
callFHIR();
This Node code configures a confidential client, acquires a token from Azure AD using the client credentials grant, and then issues an HTTPS GET to the /Patient endpoint with the bearer token. The scope is set to the FHIR service’s .default, which tells Azure AD to use the app’s assigned roles.
- Managed Identity (Node.js): When your code runs in Azure (e.g. in App Service, Functions, VM, or Kubernetes), you can enable a Managed Identity and use DefaultAzureCredential to fetch tokens with more security. For example:
const { DefaultAzureCredential } = require('@azure/identity');
const fetch = require('node-fetch');

async function callFHIRWithMI() {
  const credential = new DefaultAzureCredential();
  // Request token for FHIR service
  const tokenResponse = await credential.getToken("https://.azurehealthcareapis.com/.default");
  const accessToken = tokenResponse.token;

  // Call FHIR API as before
  const res = await fetch(`https://.azurehealthcareapis.com/Patient`, {
    headers: { 'Authorization': `Bearer ${accessToken}` }
  });
  const body = await res.json();
  console.log(body);
}
callFHIRWithMI();
This uses Azure’s built-in identity for the host. The managed identity must be assigned a FHIR role (e.g. Data Reader) in Azure. As Muthu from Microsoft notes, “Using Azure.Identity, you can connect to the FHIR service endpoint… and make sure to assign RBAC roles such as FHIR Data Reader/Writer/Contributor for the identity”.
Client Credentials (Java): Using MSAL for Java (MSAL4J) to get a token.
import com.microsoft.aad.msal4j.*; import java.util.Collections; import java.util.concurrent.*; String clientId = ""; String clientSecret = " "; String authority = "https://login.microsoftonline.com/ /"; String fhirScope = "https:// .azurehealthcareapis.com/.default"; ConfidentialClientApplication app = ConfidentialClientApplication.builder(clientId, ClientCredentialFactory.createFromSecret(clientSecret)) .authority(authority).build(); ClientCredentialParameters params = ClientCredentialParameters.builder( Collections.singleton(fhirScope)) .build(); IAuthenticationResult result = app.acquireToken(params).get(); String token = result.accessToken(); // Then use HttpClient or similar to GET https:// .azurehealthcareapis.com/Patient // with "Authorization: Bearer " + token
This Java code obtains an Azure AD token similarly, then you’d use an HTTP client to set the Authorization header on your FHIR requests. Authorization Code (Node.js Browser/MSAL): For a JavaScript web app (SPA or server-rendered), you’d use MSAL.js (or MSAL Node) to sign in the user. For example, MSAL.js in a browser can do:
const msalConfig = {
  auth: {
    clientId: "",
    authority: "https://login.microsoftonline.com/"
  }
};
const msalInstance = new msal.PublicClientApplication(msalConfig);
const loginRequest = {
  scopes: ["openid", "profile", "https://.azurehealthcareapis.com/user_impersonation"]
};
msalInstance.loginPopup(loginRequest).then(loginResponse => {
  return msalInstance.acquireTokenSilent(loginRequest);
}).then(tokenResponse => {
  const fhirToken = tokenResponse.accessToken;
  // Call FHIR, e.g. fetch Patient
  fetch(`https://.azurehealthcareapis.com/Patient`, {
    headers: { 'Authorization': `Bearer ${fhirToken}` }
  }).then(res => res.json()).then(console.log);
});
Here the user sees a login prompt (loginPopup), and the app then silently acquires a token. The scope includes user_impersonation (or .default) so that the token audience matches the FHIR service. This pattern is shown in Azure’s tutorial: after login, the app calls the FHIR /Patient endpoint with the acquired token.
In mobile apps
(e.g. Android in Java/Kotlin), you would use a library like MSAL for Android or AppAuth. The flow is similar: user
logs in via browser or embedded webview, app gets an auth code, exchanges it for a token, and uses that token for
FHIR API calls. Key points for auth-code flows: register the redirect URI, handle the Azure AD redirect, and
request scopes like openid profile offline_access https://
Calling FHIR APIs and Data Operations
Once you have an access token, call the FHIR REST API over HTTPS. Include headers such as:
Authorization: BearerContent-Type: application/fhir+json Accept: application/fhir+json
For example, a GET request to https://
In code, you can use any HTTP client. For Node.js, one might use fetch (as above) or Axios. For Java, use HttpURLConnection, Apache HttpClient, or the HL7 FHIR libraries (like HAPI FHIR or Firely FHIR client) and attach the token. For example, with Firely’s FhirClient in .NET/Java, you’d do :
client.OnBeforeRequest += (sender, e) => e.RawRequest.Headers.Add("Authorization","Bearer "+token)<
Encrypting traffic: All FHIR endpoints are HTTPS endpoints (e.g. *.azurehealthcareapis.com) and require TLS. Azure services (like Application Gateway or API Management) will enforce TLS 1.2+ for incoming connections. As one reference notes, an Application Gateway can securely receive FHIR data “over a TLS connection using client credentials flow”.
In practice, simply ensure your HTTP client only calls the https:// URL of the FHIR service.
Azure Health Data Services has no option for unencrypted HTTP – TLS is mandatory, so your data is encrypted in transit by default.
Encryption at Rest
By default, the Azure Health Data Services FHIR service encrypts all data at rest using Microsoft-managed keys (in Cosmos DB). For enhanced control and compliance, you can enable Customer-Managed Keys (CMK). This uses your own Azure Key Vault key to encrypt the FHIR database. For new deployments, you specify the cosmosDbConfiguration.keyVaultKeyUri with your key when creating the service. For example, using Azure CLI or ARM:
az healthcareapis service create \ --resource-group myRG --resource-name myFHIR \ --kind fhir-R4 --location westus2 \ --cosmos-db-configuration key-vault-key-uri="https://.vault.azure.net/keys/ "
Once set, all FHIR data is encrypted with that key version. You must give Azure AD’s service principal access to the Key Vault. If you rotate or disable the key, Cosmos DB will encrypt new writes with the new version or reject queries respectively This ensures that data at rest (in the database, snapshots, backups) is secured under your key policy.
Advanced Security & Integration Options
For high-security scenarios, consider these enhancements: Private Endpoint / Azure Private Link: You can deploy the FHIR service inside a Virtual Network by enabling a Private Endpoint. This removes any public internet endpoint, making the service accessible only within your network (or over VPN/ExpressRoute). As one reference notes, “FHIR service under Azure Health Data Services with private endpoint is deployed to ensure no publicly accessible endpoint and to securely persist FHIR data”. In practice, you create the FHIR instance with VNet integration enabled. The reference architecture below illustrates this: the FHIR service (AHDS) sits behind an Application Gateway and API Management inside a VNet, with Private DNS and connections to on-premises via VPN or ExpressRoute
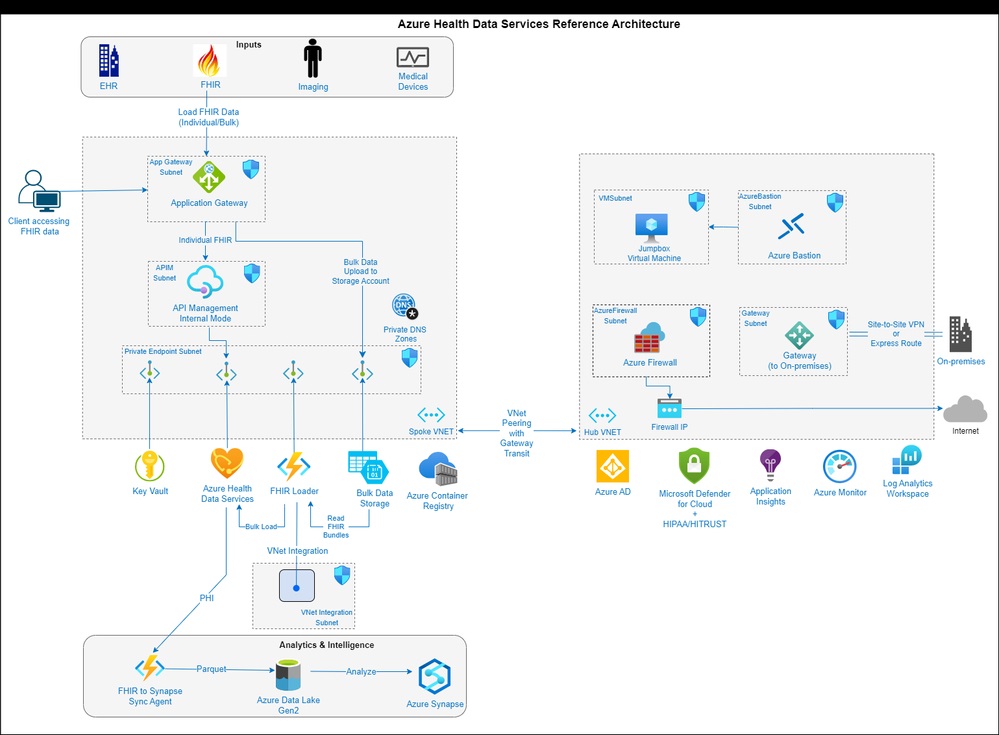
Figure: Secure reference architecture for Azure Health Data Services (FHIR) with Application Gateway, API Management, and Private Endpoint (AHDS in VNet). This ensures the FHIR API isn’t public and all traffic traverses a secure path https://techcommunity.microsoft.com/blog/fasttrackforazureblog/securely-deploying-azure-health-data-services-a-reference-architecture-and-imple/3853950
- API Management (APIM) or Azure Application Gateway: Fronting FHIR with APIM or Application Gateway adds layers like WAF, rate limiting, and additional auth. APIM can validate tokens, enforce scopes, and even transform requests. Application Gateway (with WAF) can inspect traffic. In the architecture above, APIM in internal mode and App Gateway handle client TLS and forward only valid requests to FHIR.
- Managed Identity for Azure Services: If your code runs on Azure services (like Functions, Web Apps, Logic Apps), use a System-Assigned or User-Assigned Managed Identity. This allows your Azure resource to get tokens without any secrets. Assign the identity a FHIR role (e.g. Data Contributor), and then use DefaultAzureCredential (as shown above) to authenticate. This avoids storing credentials. As the Q&A answer explains, you can use DefaultAzureCredential.GetToken() and it “would not require any code changes despite the app running locally or in production”.
- Azure Key Vault for secrets: Store any client secrets, certificates, or sensitive parameters in Key Vault. Your applications (via managed identity) or deployment pipelines should fetch them at runtime. This ensures credentials are encrypted at rest and auditable.
- Multi-Factor and Conditional Access: Use Azure AD Conditional Access to require MFA or compliant devices when logging into apps that call FHIR. For example, require MFA for any user signing into a clinician portal. This is outside the FHIR service itself but adds security at the identity layer.
- Microsoft Defender and Compliance: Azure Defender for servers and storage can monitor the VNet and Cosmos DB. AHDS is certified for HIPAA/HITRUST; use Azure Policy or Blueprints to enforce that your deployment meets security benchmarks.
- Federated/External Identity: By default AHDS trusts Microsoft Entra ID (Azure AD) tokens. If you want users to sign in with Google or social accounts, you can configure Azure AD B2C or external IdPs. For example, Azure AD B2C can allow Google or Microsoft accounts as identity providers. However, tokens must still be in a format the FHIR service accepts (audience matching the FHIR URL). In practice, you might set up an identity broker that issues tokens with the correct issuer/audience to your FHIR app. This is advanced and requires custom identity configuration.
- Use TLS (HTTPS) for all client-FHIR communication (enforced by Azure).
- Assign least-privilege roles (FHIR Data Reader/Writer) to each app or identity. Rotate credentials regularly.
- Enable Private Endpoint for production to keep FHIR inside your network.
- Use Managed Identity for services on Azure to avoid secrets.
- Enable CMK if you need control of encryption keys.
- Follow SMART on FHIR if building clinical apps, and assign the FHIR SMART User role to participating users.
- Monitor and log with Azure Monitor, and consider placing APIM for extra authentication/scoping.
Summary of Best Practices
By following these steps – proper setup, using Azure AD flows, secure token handling, and enforcing encryption – your mobile or web app (Node.js or Java) will securely connect and interact with the Azure Health Data Services FHIR API. All FHIR API calls (for create/read/update/delete) simply include the Azure AD access token in the header, and Azure ensures data is encrypted in transit (HTTPS) and at rest (Cosmos DB encryption or CMK)